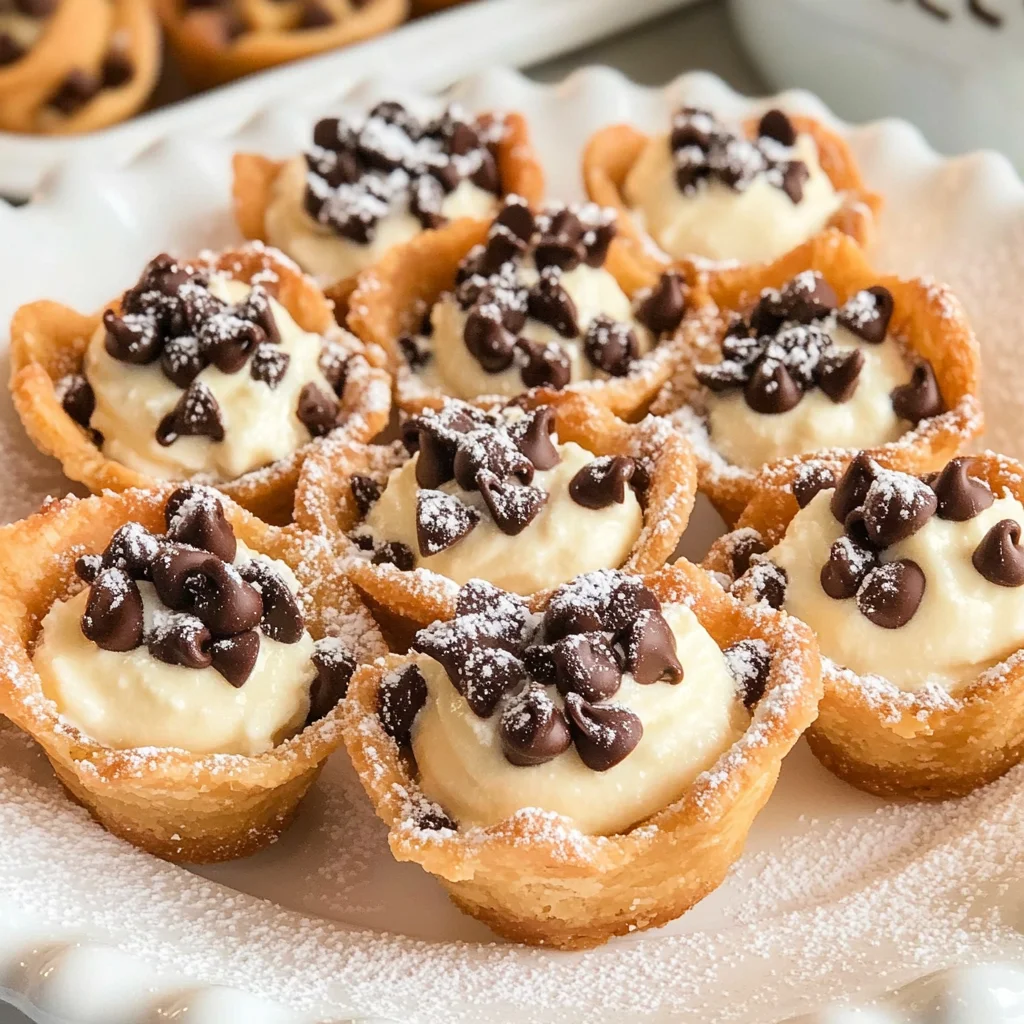
Mini Cannoli Cups
Be the star of any party or get-together with these amazingly easy and delicious Mini Cannoli Cups! This delightful dessert is perfect for various occasions, from birthdays to holidays. With their crispy pastry and creamy filling, these mini treats are sure to impress your guests. Plus, they are simple to make and can be customized with different toppings!
Why You’ll Love This Recipe
- Quick Preparation: These Mini Cannoli Cups come together in just 45 minutes, making them an ideal choice for last-minute gatherings.
- Crowd-Pleasing Flavor: The combination of sweet ricotta filling and crispy pastry will have everyone asking for seconds.
- Versatile Toppings: Customize each cup with chocolate chips or chopped pistachios for added flavor and texture.
- Perfect Serving Size: Each mini cup is a delightful bite-sized treat, perfect for sharing without overindulgence.
- Easy to Assemble: With minimal steps involved, even beginner bakers can create these impressive desserts.
Tools and Preparation
Before you begin making your Mini Cannoli Cups, gather your tools and prepare your workspace for a smooth baking experience.
Essential Tools and Equipment
- Rolling pin
- 2½-inch round cookie cutter
- Mini muffin pan
- Mixing bowl
- Electric mixer
- Zip-top resealable bag
Importance of Each Tool
- Rolling pin: Essential for rolling out the pie crust evenly and ensuring it bakes perfectly.
- Mini muffin pan: Creates the ideal shape for the cannoli cups, holding the filling beautifully.
- Electric mixer: Makes it easy to achieve a creamy consistency for the filling without too much effort.
Ingredients
Be the star of any party or get-together with these amazingly easy and delicious Mini Cannoli Cups! A real crowd-pleaser!
For the Filling
- 1 container whole-milk ricotta cheese (15 oz., drained)
- 1/2 cup powdered sugar
- 2 tablespoons granulated sugar
- 1 teaspoon finely grated orange or lemon zest
- 1/2 teaspoon vanilla extract
For the Pastry Cups
- 1 box refrigerated pie crusts, softened as directed on box (2 count)
- 3 tablespoons turbinado sugar (raw sugar)
- 1 teaspoon ground cinnamon
For Toppings
- 1/4 cup miniature semisweet chocolate chips or finely chopped pistachios
- additional powdered sugar
How to Make Mini Cannoli Cups
Step 1: Preheat the Oven
Preheat the oven to 425°F.
Step 2: Prepare the Pie Crusts
- Lightly flour a work surface and unroll the pie crusts.
- Sprinkle both pie crusts with turbinado sugar and cinnamon.
- Gently roll a rolling pin over the top of the pie crusts to press the sugar and cinnamon into the dough.
- Use a 2½-inch round cookie cutter to cut out pastry rounds.
- Gently press each pastry round into ungreased mini muffin cups.
(Note, you may need to gently re-roll the pie crusts and cut out more circles until you have 48 circles.)
Step 3: Bake the Crusts
Bake the crusts for about 10 minutes, or until golden brown. Allow cannoli cups to cool completely in the pans for about 15 minutes before removing them to a wire rack to cool completely.
Step 4: Make the Filling
While the cups are cooling, prepare the filling by beating all of the filling ingredients with an electric mixer on medium speed in a large mixing bowl until creamy. Place this filling mixture in a 1-gallon zip-top resealable bag. Seal bag tightly and refrigerate until ready to serve.
Step 5: Fill the Cups
Just before serving, remove the filling from refrigerator. Snip one corner off of the bag and pipe approximately 1 tablespoon of filling into each cooled pastry cup.
Step 6: Add Toppings & Serve
Sprinkle tops with mini chocolate chips or chopped pistachios. Dust lightly with additional powdered sugar. Serve immediately for best results!
How to Serve Mini Cannoli Cups
Mini Cannoli Cups are delightful treats that can elevate any dessert table. They are versatile and can be served in various ways to enhance their appeal and flavor.
Individual Dessert Plates
- Serve each Mini Cannoli Cup on a small dessert plate for an elegant presentation. Pair with fresh berries for added color and flavor.
Dessert Platter
- Arrange several Mini Cannoli Cups on a large platter for a visually appealing display. Consider adding edible flowers or mint leaves for garnish.
Coffee Pairing
- Offer a side of espresso or cappuccino. The rich flavors of coffee complement the sweet taste of the cannoli cups perfectly.
Ice Cream Side
- Serve alongside a scoop of vanilla or chocolate ice cream. The creamy texture pairs well with the crunchy shells and sweet filling.
Themed Events
- For themed parties, consider decorating the serving area with Italian flags or colors to celebrate the heritage of these delicious treats.
How to Perfect Mini Cannoli Cups
Creating perfect Mini Cannoli Cups is easy with some simple tips. Here’s how to ensure your dessert turns out amazing every time.
- Use Fresh Ingredients: Always use fresh ricotta cheese and other ingredients for the best flavor.
- Chill the Filling: Refrigerate the filling before piping to achieve a thicker, more stable consistency.
- Avoid Overfilling: Pipe just enough filling into each cup; overfilling can cause them to break apart.
- Serve Immediately: For the best texture, serve Mini Cannoli Cups right after filling them to maintain crispiness.
- Experiment with Toppings: Try different toppings like toasted nuts or sprinkles for added flair and taste.
- Store Properly: If you have leftovers, store them in an airtight container without filling until ready to serve.
Best Side Dishes for Mini Cannoli Cups
Pairing side dishes with your Mini Cannoli Cups can enhance your dessert experience. Here are some great options:
- Fresh Fruit Salad: A mix of seasonal fruits adds freshness and balances the sweetness of the cannoli cups.
- Chocolate Fondue: Set up a chocolate fondue station where guests can dip fruits, marshmallows, or cookies for an interactive treat.
- Pistachio Crumble: A crunchy pistachio crumble sprinkled on top provides an extra layer of texture and flavor.
- Whipped Cream: Lightly sweetened whipped cream can be served on the side for those who enjoy a creamier bite.
- Coffee Granita: This refreshing coffee-flavored frozen treat complements the sweetness of cannoli cups nicely.
- Gelato Sampler: Offer a selection of gelato flavors that guests can enjoy alongside their Mini Cannoli Cups.
- Almond Biscotti: Crunchy almond biscotti makes an excellent dipping companion for those who enjoy additional textures in their desserts.
- Mint Tea: A soothing mint tea serves as a refreshing beverage option that pairs well with rich desserts like these cannoli cups.
Common Mistakes to Avoid
Making Mini Cannoli Cups is a delightful experience, but small errors can affect your results. Here are some common mistakes and how to avoid them.
- Overmixing the Filling: Mixing the filling too much can lead to a grainy texture. Beat just until creamy for the best results.
- Ignoring Cooling Time: Skipping the cooling time for the pastry cups can cause them to become soggy. Allow them to cool completely before adding the filling.
- Using Cold Ingredients: Cold ricotta can make mixing difficult and affect texture. Make sure all ingredients are at room temperature before starting.
- Not Prepping Your Pans: Failing to properly prepare mini muffin pans can lead to sticking. Use ungreased pans or lightly spray with cooking spray.
- Skipping Garnishes: Neglecting toppings like chocolate chips or pistachios diminishes flavor and presentation. Always add a sprinkle for that finishing touch.
Storage & Reheating Instructions
Refrigerator Storage
- Store Mini Cannoli Cups in an airtight container.
- They can last up to 3 days in the refrigerator.
Freezing Mini Cannoli Cups
- Place unfilled cups in a single layer in a freezer-safe container.
- They will stay fresh for up to 2 months when frozen.
Reheating Mini Cannoli Cups
- Oven: Preheat oven to 350°F and bake for about 5 minutes until warm.
- Microwave: Heat on medium for 15-20 seconds, checking frequently to avoid overheating.
- Stovetop: Place on low heat in a pan for a few minutes, turning occasionally until warm.
Frequently Asked Questions
What are Mini Cannoli Cups?
Mini Cannoli Cups are bite-sized pastries filled with a creamy ricotta mixture, making them perfect for parties and gatherings.
Can I customize the filling for Mini Cannoli Cups?
Absolutely! You can add different flavorings like almond extract or mix in fruits such as berries or banana puree for variety.
How do I prevent my pastry from getting soggy?
Ensure that your pastry cups cool completely before adding any filling. This helps maintain their crisp texture.
Are Mini Cannoli Cups suitable for kids?
Yes! These treats are fun, easy to eat, and customizable, making them great for kids’ parties or family gatherings.
How do I make Mini Cannoli Cups ahead of time?
You can prepare the pastry cups ahead of time and store them in an airtight container. Fill them just before serving for optimal freshness.
Final Thoughts
Mini Cannoli Cups offer a delightful taste experience that is sure to impress your guests. Their versatility allows you to modify flavors and fillings based on personal preference, making them perfect for any occasion. Give this recipe a try, and enjoy creating your own delicious variations!
Mini Cannoli Cups

Delight your guests with these Mini Cannoli Cups, a charming twist on the classic Italian dessert. These bite-sized treats feature a crispy pastry shell filled with a velvety ricotta mixture, making them perfect for any occasion—from birthdays to holiday gatherings. With an easy preparation time of just 45 minutes, they are not only quick to make but also highly customizable. Whether you choose to top them with chocolate chips or chopped nuts, these mini desserts are sure to impress and satisfy any sweet tooth.
- Prep Time: 15 minutes
- Cook Time: 10 minutes
- Total Time: 25 minutes
- Yield: Makes approximately 24 mini cannoli cups 1x
- Category: Dessert
- Method: Baking
- Cuisine: Italian
Ingredients
- 1 container whole-milk ricotta cheese (15 oz., drained)
- 1/2 cup powdered sugar
- 2 tablespoons granulated sugar
- 1 teaspoon finely grated orange or lemon zest
- 1/2 teaspoon vanilla extract
- 1 box refrigerated pie crusts (2 count)
- 3 tablespoons turbinado sugar
- 1 teaspoon ground cinnamon
- mini chocolate chips or chopped pistachios for topping
Instructions
- Preheat the oven to 425°F.
- Roll out pie crusts on a floured surface, sprinkle with turbinado sugar and cinnamon, then cut into circles using a cookie cutter.
- Press each circle into ungreased mini muffin cups and bake for about 10 minutes until golden brown. Cool completely.
- In a mixing bowl, beat the ricotta, powdered sugar, granulated sugar, zest, and vanilla until creamy. Transfer to a resealable bag and chill.
- Pipe filling into cooled pastry cups just before serving and top with desired garnishes.
Nutrition
- Serving Size: 1 serving
- Calories: 120
- Sugar: 10g
- Sodium: 50mg
- Fat: 6g
- Saturated Fat: 3g
- Unsaturated Fat: 2g
- Trans Fat: 0g
- Carbohydrates: 13g
- Fiber: <1g
- Protein: 2g
- Cholesterol: 10mg