Homemade Cherry Pie Filling
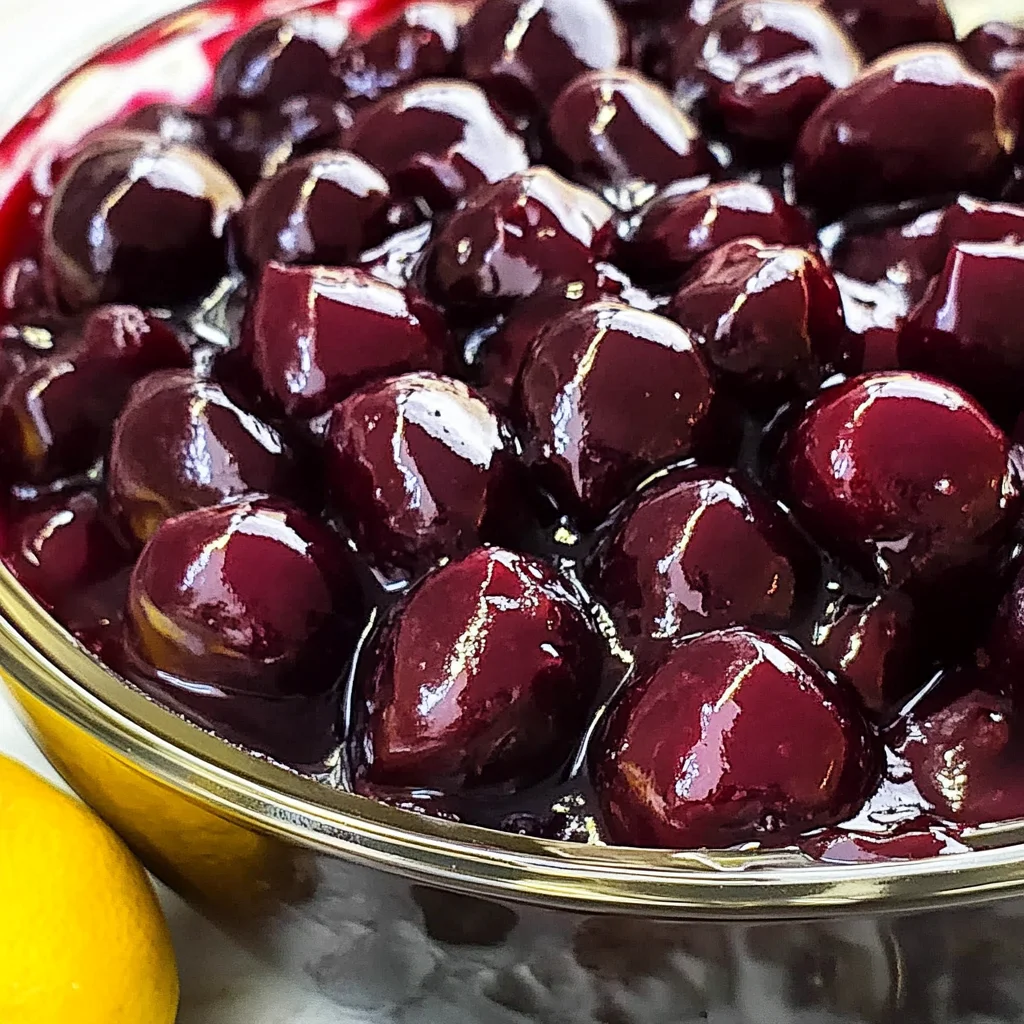
Homemade Cherry Pie Filling is a delightful treat that brings the essence of fresh cherries to your kitchen. This vibrant filling is not only bursting with flavor but is also incredibly easy to make. Perfect for a cozy dessert night, festive gatherings, or simply to elevate your everyday baking, this cherry pie filling will have you ditching store-bought options for good. With its rich taste and versatility, you can use it in pies, tarts, or as a topping for ice cream!
Why You’ll Love This Recipe
- Quick and Easy: With just a few simple steps, you can create a delicious filling in no time.
- Fresh Flavor: Made with sweet cherries, this filling is packed with natural fruit goodness.
- Versatile Use: Perfect for pies, tarts, cobblers, or even as an ice cream topping!
- No Preservatives: Unlike store-bought varieties, this homemade version has no artificial ingredients.
- Adjustable Sweetness: You can easily tweak the sugar level to suit your taste preferences.
Tools and Preparation
To make Homemade Cherry Pie Filling, you’ll need some essential tools. Having the right equipment on hand simplifies the process and ensures great results.
Essential Tools and Equipment
- Medium-sized saucepan
- Mixing spoon
- Measuring cups and spoons
- Bowl for cooling
Importance of Each Tool
- Medium-sized saucepan: Ideal for cooking and simmering the cherry mixture evenly without spilling.
- Mixing spoon: A sturdy spoon helps combine ingredients thoroughly for an even flavor throughout.
Ingredients
Homemade Cherry Pie Filling is bursting with cherry flavor. It’s so easy and delicious and so much better than store-bought; you will never buy premade again.
For the Filling
- 2 pounds frozen sweet cherries
- 3/4 cup sugar
- 1/4 teaspoon almond extract
- 1/4 teaspoon vanilla
- 1 tablespoon fresh lemon juice
- 3 tablespoons cornstarch
How to Make Homemade Cherry Pie Filling
Step 1: Combine All Ingredients
Start by stirring together all the ingredients in a medium-sized saucepan until well mixed.
Step 2: Simmer the Mixture
Bring the mixture to a gentle simmer over medium-low heat. Allow it to simmer for about 5 minutes while stirring occasionally to prevent sticking.
Step 3: Cool Before Use
Remove from heat and let the filling cool to room temperature before using it in your favorite recipes.
With these simple steps, you’ll have delicious Homemade Cherry Pie Filling ready for any dessert occasion! Enjoy the vibrant flavors and endless possibilities!
How to Serve Homemade Cherry Pie Filling
Homemade Cherry Pie Filling is a versatile treat that can enhance various dishes. Whether you want to serve it as a dessert or use it as a topping, there are plenty of ways to enjoy this delicious filling.
As a Pie Filling
- A classic choice for any cherry pie. Simply pour the filling into a prepared pie crust and bake until golden brown.
Over Ice Cream
- Drizzle warm or chilled cherry filling over vanilla ice cream for a delightful dessert that combines hot and cold textures.
In Pancakes or Waffles
- Use the cherry filling as a sweet topping for pancakes or waffles. It adds a fruity twist that elevates your breakfast.
With Yogurt
- Stir some cherry filling into plain yogurt for a refreshing snack. This combination is not only tasty but also adds nutrients.
In Parfaits
- Layer cherry filling between granola and yogurt for a beautiful parfait. This makes for an appealing dessert or healthy breakfast option.
On Toast or Bagels
- Spread some cream cheese on toast or bagels and top with the cherry filling for a quick and tasty brunch item.
How to Perfect Homemade Cherry Pie Filling
To make your Homemade Cherry Pie Filling even better, consider these helpful tips:
-
Use quality cherries: Fresh or high-quality frozen cherries will have the best flavor and texture in your filling.
-
Adjust sweetness: Taste the mixture before cooking; you can add more sugar if you prefer it sweeter.
-
Thicken properly: Ensure to mix cornstarch thoroughly with the cherries to avoid lumps in your filling.
-
Cool completely: Allow the filling to cool to room temperature before using it in recipes; this helps maintain its structure.
-
Add spices: Consider adding a dash of cinnamon or nutmeg for an extra layer of flavor that complements the cherries beautifully.
Best Side Dishes for Homemade Cherry Pie Filling
Serving Homemade Cherry Pie Filling can be enhanced by pairing it with complementary side dishes. Here are some great options:
-
Vanilla Ice Cream
A classic pairing, the creamy texture balances the tartness of cherries perfectly. -
Shortcake Biscuits
Fluffy biscuits provide a delightful contrast to the sweet and juicy cherry filling. -
Pecan Crumble
The crunchy pecans give added texture and richness alongside the sweet cherry flavor. -
Angel Food Cake
Light and airy cake serves as an excellent base for spooning on your homemade cherry pie filling. -
Cheesecake Bites
Mini cheesecake bites topped with cherry filling create an indulgent yet bite-sized treat. -
Fruit Salad
A refreshing fruit salad pairs well, providing a light balance to the richness of the pie filling.
Common Mistakes to Avoid
Making Homemade Cherry Pie Filling can be simple, but there are a few common mistakes to watch for.
- Bold Ingredients: Using the wrong type of cherries can lead to a less flavorful filling. Always use sweet cherries for the best taste.
- Bold Sugar Measurement: Not measuring sugar accurately can ruin the balance of sweetness. Be precise with your measurements.
- Bold Cooking Time: Overcooking the filling may result in a mushy texture. Stick to the recommended simmering time.
- Bold Cooling Process: Skipping the cooling step can affect how well the filling sets. Allow it to cool to room temperature before using.
- Bold Storage Method: Improper storage can lead to spoilage. Always use airtight containers for storage.
Storage & Reheating Instructions
Refrigerator Storage
- Store your Homemade Cherry Pie Filling in an airtight container.
- It will keep well in the refrigerator for up to 1 week.
Freezing Homemade Cherry Pie Filling
- You can freeze it for longer storage, up to 6 months.
- Use freezer-safe containers or zip-top bags, leaving some space for expansion.
Reheating Homemade Cherry Pie Filling
- Bold Oven: Preheat your oven to 350°F (175°C) and reheat the filling in a baking dish until warm.
- Bold Microwave: Place in a microwave-safe bowl and heat in short intervals, stirring in between until hot.
- Bold Stovetop: Gently reheat on low heat while stirring frequently to avoid burning.
Frequently Asked Questions
Here are some common questions about making Homemade Cherry Pie Filling.
Can I use fresh cherries instead of frozen for my Homemade Cherry Pie Filling?
Yes, fresh cherries can be used! Simply pit and chop them before following the same recipe instructions.
How do I thicken my Homemade Cherry Pie Filling?
If you need a thicker filling, gradually add more cornstarch mixed with a bit of water while cooking until you reach your desired consistency.
Can I make this Homemade Cherry Pie Filling ahead of time?
Absolutely! This filling can be made ahead and stored in the fridge or frozen for later use.
What can I use instead of sugar in this recipe?
You can substitute sugar with natural sweeteners such as honey or maple syrup, adjusting based on sweetness preference.
How long does Homemade Cherry Pie Filling last?
In the refrigerator, it lasts about one week; if frozen, it can last up to six months without losing quality.
Final Thoughts
Homemade Cherry Pie Filling is not only delicious but also incredibly versatile. Whether used in pies, desserts, or as toppings, this recipe is sure to impress. Feel free to customize it with spices or additional fruit flavors!
Homemade Cherry Pie Filling

Indulge in the vibrant taste of Homemade Cherry Pie Filling, a delightful addition to your dessert repertoire. Bursting with the natural sweetness of cherries, this easy-to-make filling transforms any baking endeavor into a gourmet experience. Whether you’re preparing a classic cherry pie, drizzling it over ice cream, or layering it in parfaits, this versatile recipe is sure to impress. With no preservatives and customizable sweetness, you’ll never reach for store-bought options again. Perfect for any occasion—from cozy family nights to festive gatherings—this cherry filling elevates everyday desserts into something truly special.
- Prep Time: 10 minutes
- Cook Time: 5 minutes
- Total Time: 15 minutes
- Yield: Approximately 4 servings 1x
- Category: Dessert
- Method: Cooking
- Cuisine: American
Ingredients
- 2 pounds frozen sweet cherries
- 3/4 cup sugar
- 1/4 teaspoon almond extract
- 1/4 teaspoon vanilla extract
- 1 tablespoon fresh lemon juice
- 3 tablespoons cornstarch
Instructions
- In a medium-sized saucepan, combine all ingredients and stir until well mixed.
- Bring the mixture to a gentle simmer over medium-low heat. Stir occasionally for about 5 minutes to prevent sticking.
- Remove from heat and let cool to room temperature before using.
Nutrition
- Serving Size: 1/4 cup (60g)
- Calories: 90
- Sugar: 17g
- Sodium: 0mg
- Fat: 0g
- Saturated Fat: 0g
- Unsaturated Fat: 0g
- Trans Fat: 0g
- Carbohydrates: 22g
- Fiber: 1g
- Protein: <1g
- Cholesterol: 0mg